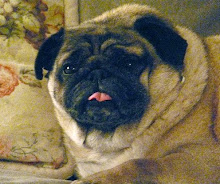
Saturday, February 28, 2009

Farm Geese, Toulouse Geese, Art tip # 11

" Going Places "
Day 3
Oil
Before I comment on the progress of this oil I wanted to mention that my new web site is launched! I hope you'll take a few minutes to visit and please sign up for my monthly email newsletter if you like. If you are an artist considering your own web site I highly recommend Fine Art Studios Online. I can now keep my web site updated easily myself! You can test drive your own site during a free trial period. Let me know what you think!
Now, this painting. Seven geese down and two to go. Once all the geese are blocked in and the grassy foreground is completed I will go over the geese again, softening some to keep the main focus on the Toulouse, gray goose, you see here, maybe some glazing and scumbling to unify the overall lights and darks. In the lower right corner of the photo you can see one of my Canada Geese giclee in the print bin. In the past a majority of my subjects were birds, zebras and fish. I really wanted to be doing still life, too, but no time. Now I do mostly still life and long to do birds again. These farm geese will be a start!
Art tip # 11: When I know I won't be able to complete a painting in one day, at the end of the painting session, I soften any hard edges on areas that still need work. To do this I take a blending type brush or actually any old bristle brush will do. Lightly and quickly roughin up the edges. You can always create hard edges again, but it isn't easy to cover up a hard edge that has dried (I use Liquin, a medium that speeds the drying of oils). If you click on the painting you can see where I roughed up the edges of the gray goose. I can tighten things up again later.


Friday, February 27, 2009

Farm Geese, Art Tip # 10

" Going Places "
Day 2
Oil
I sure felt rusty today, getting back to painting. But, like always, I just needed to focus and it didn't take long to make some progress. At least I completed the rough in of the two geese in shadow.
You can see my premixed palette. The oils were just fine after being ignored for these past few days while I recovered from a head cold. Tomorrow I hope to have all the geese blocked in!
Art Tip # 10: Nine out of ten paintings usually reach a mid point where I always have the feeling it isn't going to work and I begin to doubt myself. I call this "the ugly stage" because experience has taught me that it only means the painting isn't done and I need to keep going. Usually it doesn't take too much more to bring it to a completion. Now, I have also experienced getting to "the ugly stage" and can't think what to do next or I've lost interest. That's when I put the painting aside and come back later, sometimes weeks or months or even years later with a fresh eye. Oh, by the way, the 10% that I do finish without doubting mysef painted themselves..someone recently gave credit for this phenomenon to the "paint fairies". I always say the paint just fell off the brush and landed in all the right spots!

Wednesday, February 18, 2009

Farm Geese, Toulouse Geese, Art tip #9

" Going Places"
Day 1
Oil on linen
Here's a painting I began yesterday with a general rough-in around the birds. Everything is pretty soft so far, I didn't want to leave any hard edges until I get the geese roughed in. I am using a pre-mixed palette. I had some fun comments the last time I posted the stages of a painting. Usually I don't like to show a painting until its finished. But here in the art blog world there are so many artists who love to see how other artists work. I know I do. Stay tuned.
Art tip #9: This I learned from Daniel Greene. Instead of using the terms warm and cool to describe a color use "blue-ish" or "yellow-ish". This makes total sense. If a color is hard to identify, usually a very grayed, dull color ask yourself if it is "more bluish or more yellowish". Then you'll know how to start mixing it. I've heard some artists call Ultramarine Blue a warm blue..I've always considered it a cool blue because it is more "bluish" than "yellowish". To me Cerulean and thalo are warmer because they are going towards the yellow side of the color wheel. Ultramarine is a blue-violet. I'd like to know your thoughts on this topic. Thanks for visiting my blog!

Tuesday, February 17, 2009

Crow, Oil Workshop Students, Art tip #8

" Still Life with Iron Crow "
20"x24"
Oil
Private Collection
Vickie & Carol with their beautiful color studies in oil
This past week has been fun having two very enthusiastic students. I felt more like a coach than a teacher. Vickie and Carol both have intuitive color and design sense. Vickie has been painting for some time, mostly using photo reference. During this workshop she worked only from life using a basic palette and learned how much more color there is to see than what a photo shows. Carol is a beginner who naturally applies lots of paint. Usually its hard to get beginners to load their brushes. Most want to conserve paint and the end results are flat and lifeless. It's called painting for a reason... don't be afraid to use lots of paint.
Tip #8: Put plenty of paint out at the beginning of a paint session. Nothing breaks your flow like running out of a color and having to get more or worse (especially when painting outdoors) to make-do with some other color or mixture just 'cause its on your palette. I teach a basic palette of 7 colors plus white, black and three value grays to dull color with.

Monday, February 16, 2009

Succulents, Allied Artists of America, Artist tip # 7

" Succulents II "
Oil
42"x42"
Artist's Collection


Back in 1985 I took some time from my batik paintings to do a few oils. This one I entered in the annual Allied Artists of America show in NYC. It won the Gilmore/Romans award for oil. I decided I couldn't part with it so it has hung in my home all these years! I still love it, but if someone is interested in purchasing it please contact me. I find as I get older I'm not as attached to things as I once was. I'm also getting geared up in my head to continue this succulent series. I posted another one some time ago.

Artist tip #7: I always tone my canvas and panels. You now have a mid-value surface to judge color against and it gives overall harmony..especially if you lift off color. On Succulents II I used cadmium yellow light oil thinned with turp. In the last 10 years I haven't used any turpentine in my studio..too toxic. Instead I clean brushes with mineral spirits or Turpenoid natural. Current favorite colors to tone with: yellow oxide or raw sienna...acrylic..it dries fast.

Monday, February 9, 2009

Artichokes, Artist Statement, Art tips #6

" Artichokes on Blue "
Oil
12"x12"
Private Collection
Artichokes are such a beautiful plant, perfect complimentary colors of greens and reds. This little painting was purchased by a good friend. His family is in the artichoke business, so I'm glad this painting ended up with him.

Tip for seeing color: punch a little hole in a 2"x3" cardboard. Use it to "isolate" color areas in your still life set-up or plein air view. Mix and paint that color. Do this for every main shape/area of your painting. You will mix incredible colors..no more mud. Carry this little "spot screen" with you on a walk. Ask yourself; what color is that building? road? mountian? car? Especially look at shadows. Now use the spot screen on the same objects. Wow! Paint what you see, not what you know.


Friday, February 6, 2009

Tuxedo Cat, Oil Pastel, Art tips #5

" Bustafur Jones "
Oil Pastel
Private Collection
A painting from the past! I rarely paint cats probably because I don't have one. My husband is allergic to them.
I thought I would post the artists statement I wrote last summer for a specific show. This show wanted a statement to be more about the process. In reviewing "I'd Rather Be in My Studio" I realized I needed to edit it further, trying for the two paragraphs Alyson Stanfield recommends. It was actually pretty easy this go-around. My attitude was slash, slash, slash. Felt great and I think this one will work for my new web site. Would love your feedback if you care to comment.
Jennifer Bellinger
Artist Statement 2008

Thank you for taking time today to visit my exhibit!

I have been a professional artist for nearly 40 years, living and working in my Ketchum home and studio since 1978 with husband Gary, son Corey and pug dog Jack

My current direction is painting the still life in oils. I use traditional oil painting techniques on canvas, linen or gesso board. Craftsmanship is very important to me. I use only the best materials in time honored ways that will assure my work stays true to form. Small paintings are given the same careful attention as larger work.

My still lifes are about finding the beauty in everyday objects. I am especially drawn to vintage objects that have had a previous life.

The most interesting part of painting to me is the composition or design phase. The beauty of still life is that I am the conductor; I get to move the objects around until I see an arrangement that is pleasing and dynamic to my eye. I look for relationships of shapes, color, contrasts of light & dark and, of course, what is to be the center of interest. I employ these same elements of design to landscape or animal paintings, too.

Because my paintings are strong in design and color they bring life and energy to a room.

Fellow artist, Elizabeth Floyd said “I like the way Jennifer’s paintings seem to tell a story, as if we are getting a glimpse of someone’s daily life, with an action about to take place that will alter the vignette we have just been privileged to witness.”

In the summer and fall I enjoy teaching workshops and sharing my artistic process with others.

Here's the new, shorter version:
Jennifer Bellinger
Artist Statement 2009

"The current direction of my art is painting the still life in oils. My still life paintings are about finding the beauty in everyday objects. I am especially drawn to vintage objects that have had a previous life.
The most interesting part of the painting process to me is the composition or design phase. The beauty of still life is that I am the conductor. I get to move the objects around until I see an arrangement that is pleasing and dynamic to the eye. I look for relationships of shape, color, contrasts of light & dark and what is to be the center of interest. Because my paintings are strong in design and color they bring life and energy to a room.

A fellow artist said “I like the way Jennifer’s paintings seem to tell a story, as if we are getting a glimpse of someone’s daily life, with an action about to take place that will alter the vignette we have just been privileged to witness.”
(note: for Elizabeth..I didn't use your name on the quote for second version. Alyson recommends not referring to other people which could take focus away. Maybe I should drop the quote all together...but I love it, so there it is." Thanks, again E.

Thursday, February 5, 2009

Animal Shelter of the Wood River Valley, Chicago Cows, Labrador Retreiver, New Mexico Painted Ponies

Wood River Pet Lab
Oil on Fiberglass
40"x28"
Private Collection
Detail
PeeWee the Guinnea Pig


Detail

Our Pug Jack

Corey's Sweetie Rat
All image copyright J.Bellinger

I need to get back in the studio and paint! Prepping images for my new web site is taking tons of time. My oil painting workshop is going well, day 3 of a 4 day class completed. My students are coming over to the studio this Saturday.
I decided to post images of "Wood River Pet Lab". Our local animal shelter has used these fiberglass lab forms for big fund raisers. The event was patterned after the Chicago Cows, New Mexico's Painted Ponies, etc. Artists are commissioned to paint them and then they are auctioned. I have completed three of them to date. It is something to see 40 or more together on one large room. Artists are so creative. My approach is pretty traditional. One of my favorites was covered entirely with coffee beans. The artist even covered a base with the burlap coffee sack and the dog is holding a coffee cup/saucer in his mouth! It now resides in a local coffee shop called Zaney's.
Lots of money raised for our local no-kill shelter.

Tuesday, February 3, 2009

Corgi dog portrait, Leonard Wolfe, Art tip #4

"Buckie"
Oil
6"x8"
Private Collection
Buckie runs my friends Melinda & Dicks ranch. As I was speaking with Melinda yesterday I could hear Buckie next to her, vying for attention, much like a two year old does when mom gets on the phone. Anyway, I thought I would post this today and hopefully bring a smile to Melinda's face when she opens her email.
My thoughts are too scattered today to post a tip but I promise to do so tomorrow. I've been resizing digital images to post on my new web site. My computer crashed a couple of weeks ago and my computer man installed Picasa. I finally found the cd for the program I am used to..thank God. I don't have to learn a new way!
I'll leave you with one of my favorite quotes:
"You can't edit a blank page" by Leonard Wolfe. I post this on my big easel.

Visit my art blog friend, Mary Sheehan Winn to see a super fun YouTube video she posted today.


Monday, February 2, 2009

Lemons & Mandarins, Artist's Statement, Art tip #3

"Lemons & Mandarins"

Oil

11"x14"

Private Collection

Yesterday Karen Hargett wanted to hear a few tips on writing an Artist's Statement.
Like most artists I procrastinated (detested is more like it) updating mine. Using the step by step actions in I'd Rather Be in the Studio put me on the right path. Author,Alyson Stanfield really calls you to take action with specific exercises. Here are a few tips that got me going:
1. Learning what is an artist's statement and what isn't
Big news for me: it isn't a brief Bio. It's about your current work & direction. Alyson says "Above all, your statement should compel readers to look at your art. If it doesn't do that, it hasn't done its job."
2. "Keep it in the first person" and "Keep it short"
( I need to go back now and really hone mine again, its too long)
There is so much help in her book. One thing that appealed to me was to take all the ideas I had written down, cut them out (scraps of my thoughts). She suggested putting them in a shoebox. While this is tidy, I know I could easily forget where the box it. I taped them to a large poster board..kind of like creating a story board and kept it where it could get my attention.Then when I had time I would edit them and put them in order that made sense. It was easy to see where I'd repeated something or got too heavy. Just the physical act of pulling that scrap off the board and tossing it made me feel like I was getting somewhere.
To sum up for this post...it takes time to write an artist's statement. It is well worth the effort. I have just scratched the surface here..hoping to lead you to the wealth of knowledge and help in Alyson's book. Get it, read it, do the work. If there is one thing I can pass along to artists who want to be self supporting (and I know you don't want to hear this, I can feel you cringe!) Your art is a business. You must do what it takes to run that business, the rewards are many. It isn't hard..consistency is the key.
Make a plan, take an action.

Sunday, February 1, 2009

Apricots, Oil Painting Workshop, Art Tips

" Idaho Apricots "
Oil
6"x8"
Private Collection


I painted this oil outside in bright sunshine (no, not today.. during the summer). I wanted to show it today because I have been talking to the students in my oil painting workshop about highlights. Highlights are often the lightest part of an object and attract our eye. Highlights need to be accurate in order to describe the texture of that object. For example here on the apricots the highlights are very, very subtle..no hard edges, because that is what I observed. Apricots and peaches are fuzzy. If you observe your object carefully and paint what you see not what you know it will be correct.
I was reviewing my Artist Statement today. One of the shows I exhibited in last summer required one. I had been putting off updating mine for years! I'd recently purchased Alyson Stanfield's excellent art marketing book. I'd Rather Be in the Studio The section on writing artist statements took the fear right out of the entire process. She goes beyond telling you how to do something with specific examples of what to do. If any of you are interested in how I took her tips and wrote my own statement, let me know and I will do a post on that topic.